
Find a Local Klaus Roofing
Contractor Near You!
Before & After Photos
Click on a photo to enlarge.
Before & After Chimney Repair and Roof Flashing Restoration in Allen, TX
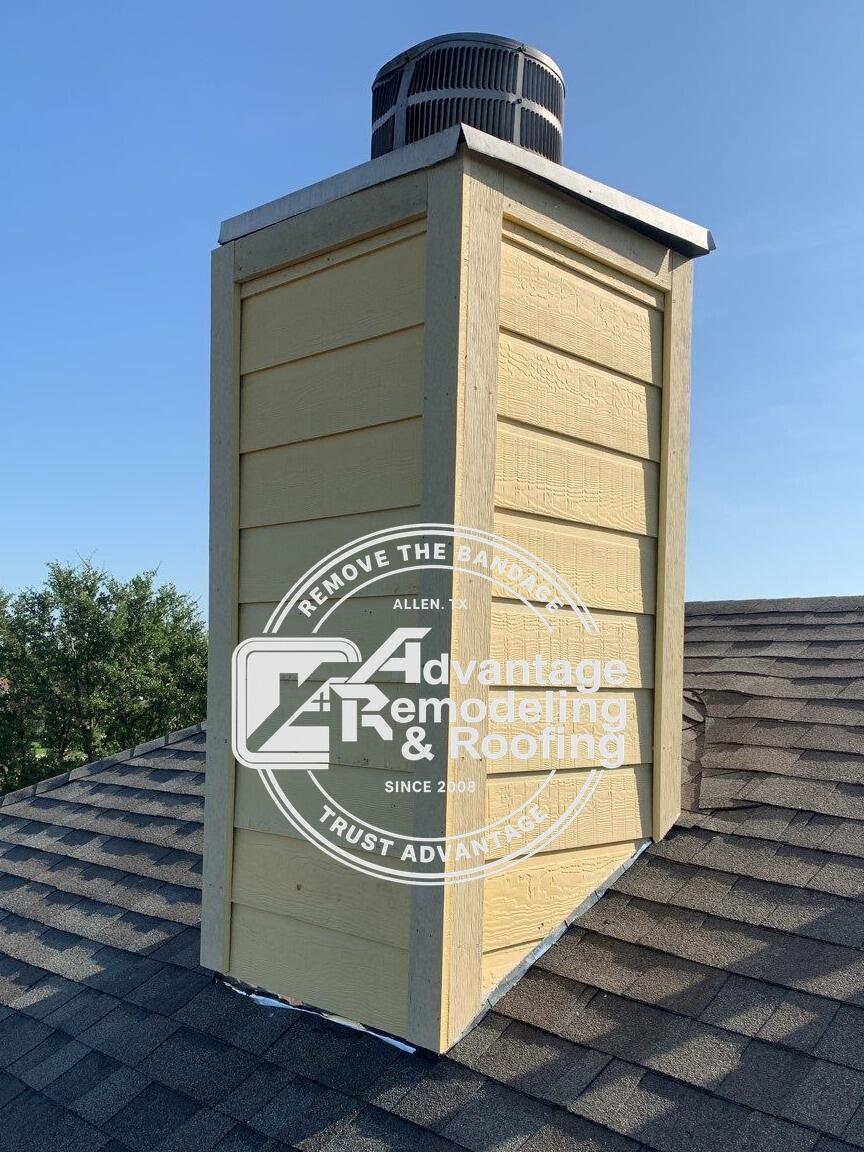
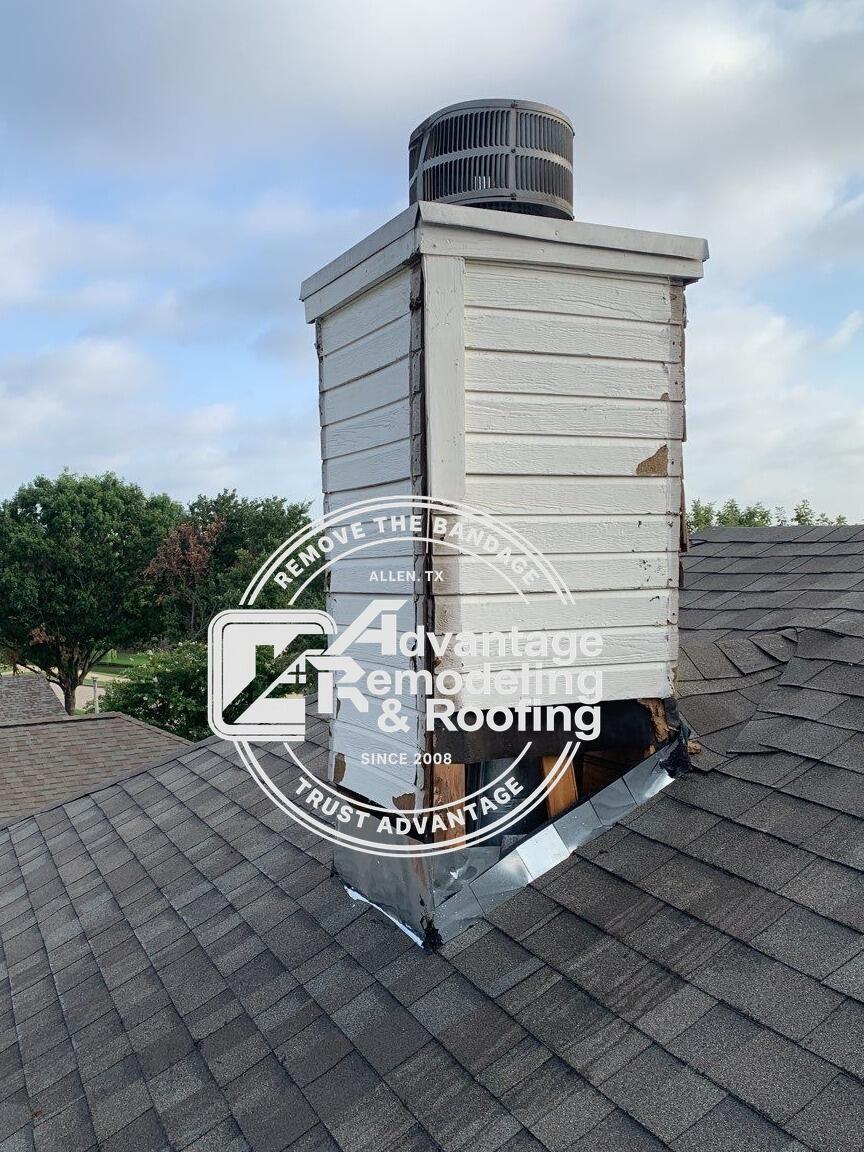
The roof-to-chimney transition was the center of this Allen repair project. A leaking chimney area and deteriorated roof flashing required restoration work concentrated on that interface instead of a whole-roof replacement. That narrow focus makes the Before and After sequence useful for homeowners who may notice water or exterior deterioration around a chimney while the rest of the roof remains a separate question.
The work included removal of damaged flashing, chimney waterproofing improvements, roof sealing, replacement of compromised materials, and reinforcement of vulnerable transition areas. In the Before image, the chimney-and-roof junction is shown before the restoration was complete. In the After image, the same area has a cleaner, finished appearance with the repaired transition integrated into the surrounding roof surface.
Chimneys create several intersecting exterior surfaces: the chimney body rises vertically while the roofing slopes around it, and flashing bridges that change in direction. On this Allen home, the repair was centered on that intersection and the materials immediately around it. The finished result therefore has to read as part of both the chimney exterior and the roof surface.
For homeowners, the project shows how a focused chimney-and-flashing repair can involve several connected steps even when the work is confined to a relatively small area. Damaged flashing was removed, waterproofing and sealing work were completed, compromised material was replaced, and the roof transition was restored to a finished condition. The After image brings those separate repair steps together in one visible roof-to-chimney assembly.
The repaired junction now reads as one continuous, finished detail around the chimney base.
Roof Replacement in Allen, TX. Euroshield Robben Roof Upgrade.


The roofing material is what separates this Allen replacement from a more conventional asphalt-shingle project. The homeowner selected Euroshield Robben roofing, identified for this job as a recycled-rubber product made from recycled tires. That choice followed an ongoing roof issue and turned the reroof into both a needed replacement and a distinctive material upgrade. The Before image catches the house during active work, when several roof planes are exposed and workers are positioned across the structure. Because the photo was taken in the middle of replacement, parts of the roof show decking or underlayment rather than a complete finished surface. Property-protection materials are also visible below. The house has multiple intersecting planes, including smaller roof sections around the rear elevation, so the work-stage image breaks the roofing system into many separate visual pieces. That temporary condition provides a strong contrast with the continuous dark surface in the After view.
Euroshield Robben was selected for this project, and the finished roof has a dark patterned appearance across the main planes and smaller bay-window sections. Homeowners researching roof replacement options can use this Allen example to see how an alternative roofing material looks once it is installed on a real multi-plane home. Its dark patterned surface becomes one of the most recognizable features of the completed rear roofline.
The roof geometry remains unchanged between the two stages. Ridges, valleys, rear walls, windows, and smaller roof sections all provide fixed reference points. What changes is the condition of the roofing surface. In the first image, construction materials and exposed areas interrupt the roof. In the second, the dark patterned finish carries over the same geometry, allowing separate planes to read as parts of one completed roof again. Material selection can influence the visual character of a reroof even when no architecture is altered. A homeowner may choose a product because of appearance, material composition, or other priorities discussed during planning. In this case, the recycled-rubber composition was specifically part of the project story. That makes the finished Allen roof a useful residential example of a reroof where the product category itself is a defining feature rather than an incidental detail.
The recycled-tire origin is also worth keeping in its proper place. Its recycled-tire composition was part of the homeowner's material choice and gives this Allen reroof a different material story from a conventional asphalt-only replacement. The visible project can stand on its own: an ongoing roof issue led to replacement, the homeowner selected Euroshield Robben, active multi-plane work followed, and the finished home received the dark roofing surface seen afterward.
Local homeowners considering roofing work in Allen may encounter many material choices. This project gives them one concrete point of comparison. The house retains the same shape and rooflines before and after, so the difference created by the roofing selection is not mixed with major structural changes. That makes the final material easier to evaluate visually against the existing exterior.
The smaller bay-window roof sections are particularly helpful in the final comparison. They repeat the same dark material used on the larger planes, showing that the selected roofing was carried across secondary architectural features as well as the main roof. That consistency lets the product choice read across the whole rear elevation instead of appearing as a change limited to one dominant slope.
The most memorable contrast is between the fragmented construction stage and the unified final roof. Exposed sections, workers, and temporary protection define the beginning; a continuous dark Euroshield Robben surface defines the end. Across the same Allen home, the replacement closes the ongoing roof issue with the specific recycled-rubber roofing material chosen for this project, creating a completed roof that is visually distinct from the work stage that preceded it.
Fence Replacement in Allen, Texas - Complete Transformation
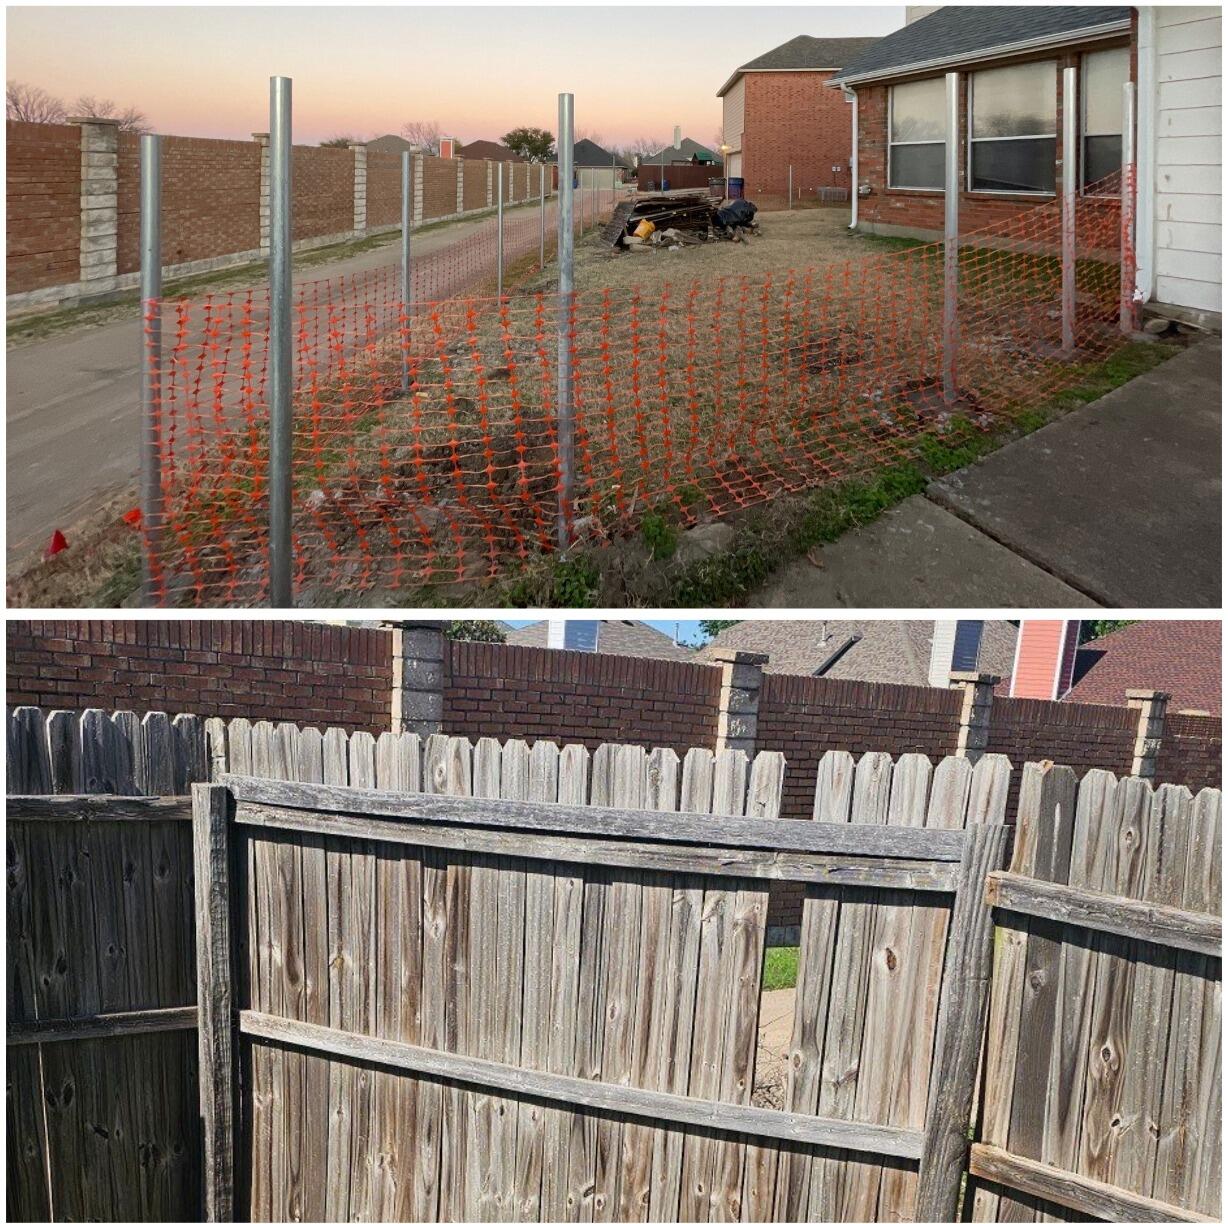
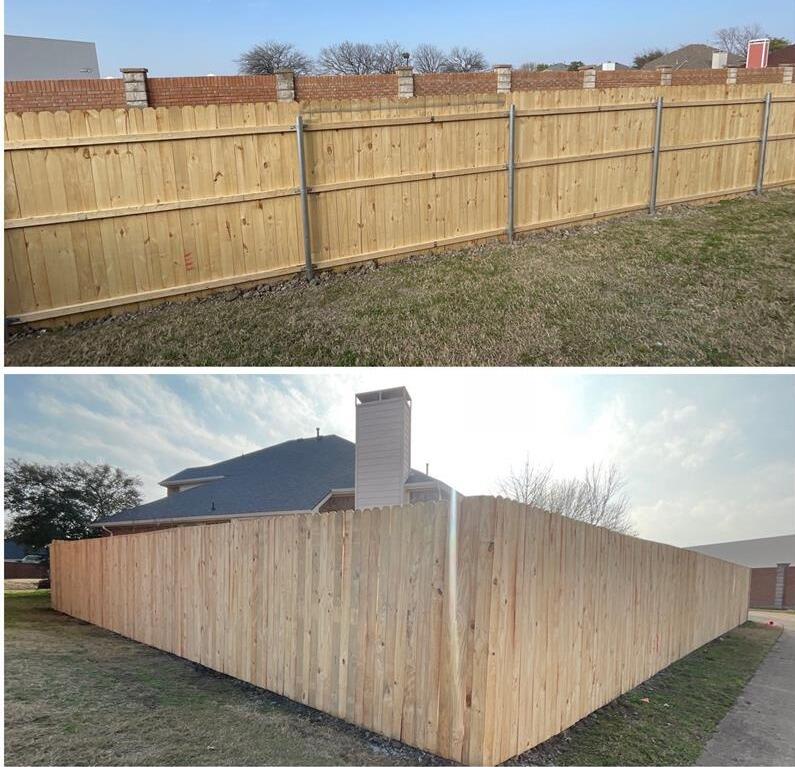
A failing fence can make an entire backyard edge look uncertain, and that was the starting condition at this Allen property. The existing wood fence was rotting, unstable, and heavily damaged by hail. In the work-stage photo, the boundary is visibly disrupted: weathered material is being removed, bare metal posts are exposed, and orange safety mesh marks part of the open area. The scene looks temporary because the old enclosure had reached the point where a complete replacement was chosen instead of another limited repair.
Full fence replacement changes more than individual boards. A long property boundary depends on repeated vertical lines, a consistent top edge, stable posts, and an orderly relationship with the yard beside it. When many sections have deteriorated, patching one board at a time can leave the enclosure visually uneven. This project moved in the opposite direction, removing the compromised fence and rebuilding the boundary as a continuous assembly through the broader remodeling and restoration work performed at the property.
The Before condition shows why the replacement scope was substantial. Rot and instability were not described as isolated to one decorative element; the fence itself was in poor condition after hail damage. The temporary mesh and exposed posts make the loss of a normal privacy boundary easy to see. During a full replacement, that open stage is unavoidable for a period of time, and it can be one of the most dramatic parts of the job because the familiar enclosure disappears before the new one is assembled. The finished photo is almost the visual opposite. Light wood boards run in a straight line, horizontal rails organize the back of the fence, and metal posts create repeated structural points along the boundary. Instead of leaning or broken sections pulling the eye in different directions, the new fence has a consistent top line and a much more orderly appearance. The transformation is especially noticeable because the yard edge and surrounding vegetation remain recognizable between the two stages.
For a homeowner, fence condition is both a practical and visual issue. A privacy fence defines outdoor space, frames views from patios and windows, and forms part of the route through a side or back yard. When the enclosure is rotting or unstable, the problem is difficult to ignore because it stretches across a large portion of the property. Replacing the full run can restore a clear boundary and remove the patchwork appearance that develops when widespread deterioration has accumulated. This Allen project also demonstrates why the temporary construction condition should not be confused with the final outcome. During removal, the property edge can look more open and less finished than it did before work began. Posts, mesh, tools, and incomplete sections are part of the transition. The completed fence only becomes clear after those temporary elements are gone and the board pattern can be read continuously from one end of the visible boundary to the other.
Homeowners looking at Allen exterior improvement projects can use this transformation as a practical example of replacement driven by condition rather than by a simple style change. The old fence was rotten, unstable, and hail damaged. Those facts explain the decision to remove the compromised enclosure and rebuild it instead of treating the job as routine staining or a narrow cosmetic update.
By the final photo, the orange safety mesh, deteriorated boards, and uneven sections have disappeared. What remains is a straight light-wood privacy fence supported by metal posts, giving the yard a defined and consistent perimeter again. The change is easy to understand without exaggeration: an unstable, damaged boundary was taken down, and a complete new fence was installed in its place, leaving the Allen property with a much more coherent outdoor edge.
Siding Replacement in Plano, TX
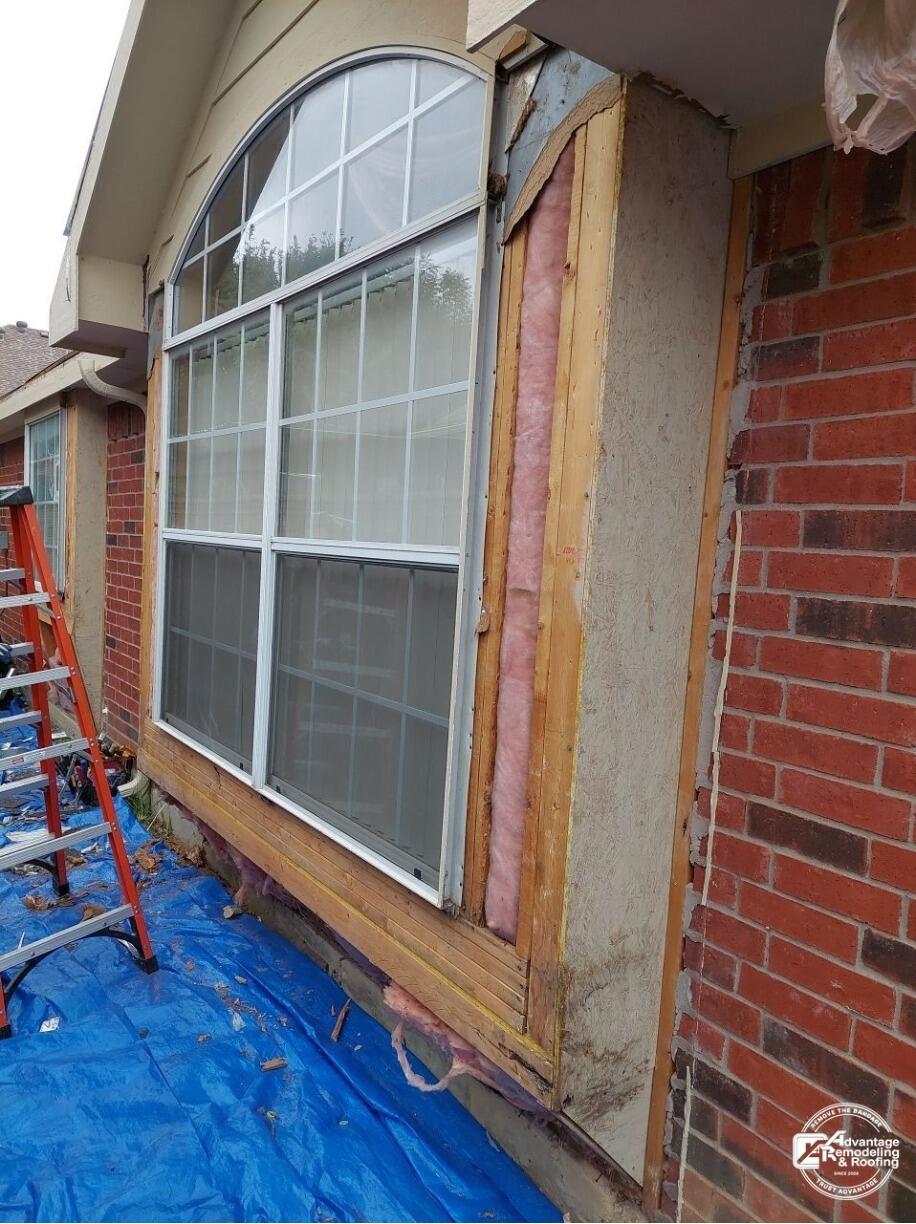
A large arched window gives this Plano siding replacement its clearest visual story. In the first photograph, much of the siding and trim around the window has been removed. Wood framing or substrate is visible at portions of the perimeter, pink insulation can be seen in exposed sections, and a ladder and protective tarp reinforce that the exterior is actively being worked on. The brick wall remains in place around the project area, so the image captures a moment when the window surround is temporarily open while the siding replacement is underway.
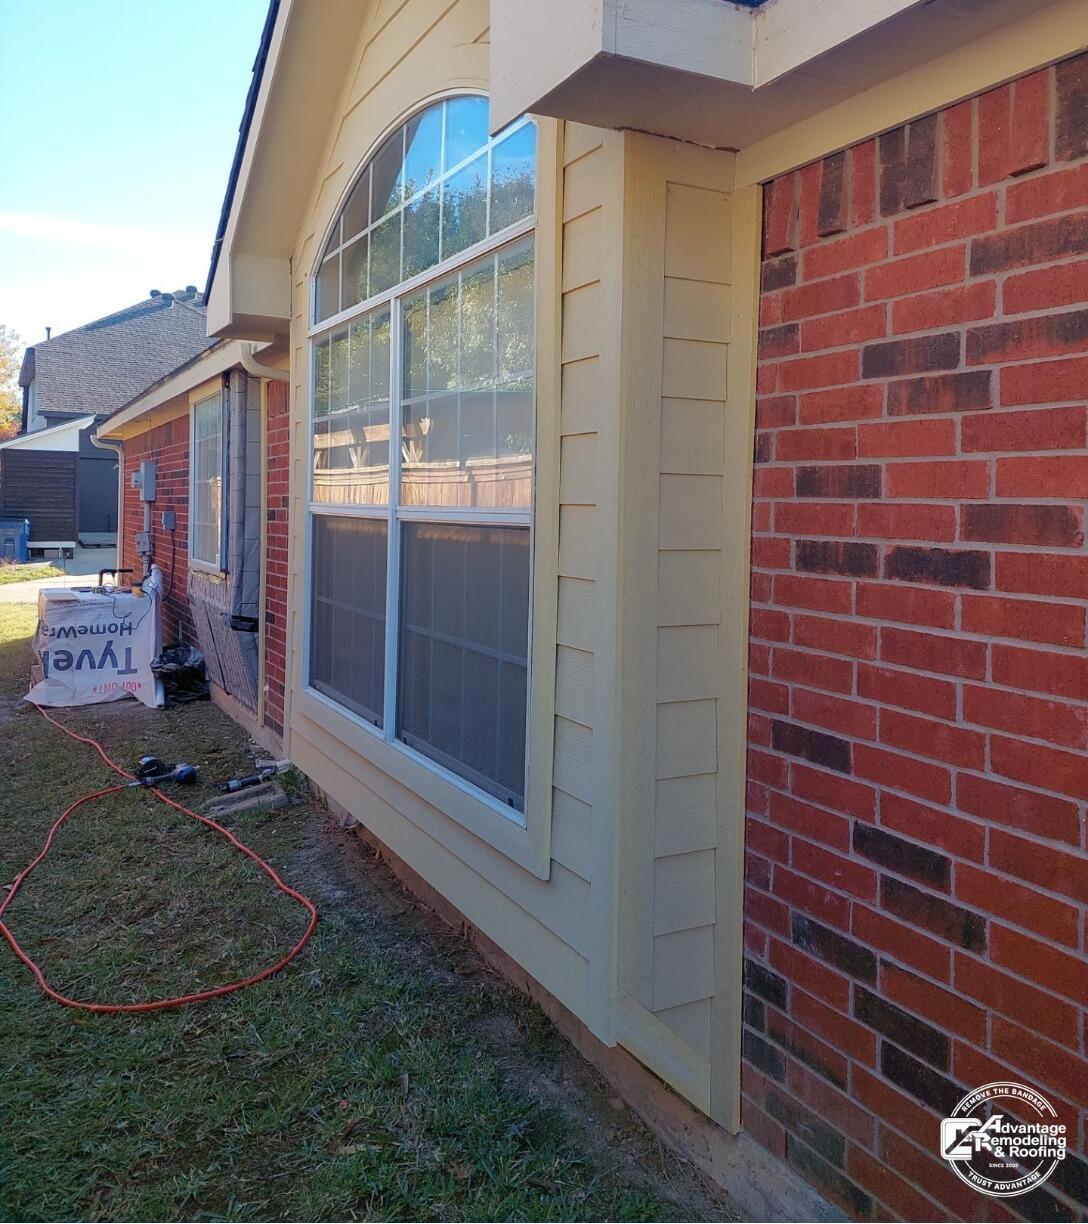
The completed view is dramatically different in presentation. Light tan or beige siding and finished trim surround the same arched window, and the exposed framing and insulation visible earlier are no longer open in the photographed area. The finished surface creates a more continuous transition between the curve of the window, the adjacent siding, and the brick exterior. Because the window is large and architecturally prominent, the improvement in visual continuity is easy to see from the finished exterior surface alone. Arched windows can make exterior siding work visually demanding because straight siding courses and trim elements must meet a curved architectural feature. From a homeowner's perspective, the finished appearance depends on more than the siding field itself. The eye naturally follows the window perimeter, the edges where siding meets trim, and the transition from the upper wall to the brick below. A project photo that shows those relationships clearly is useful when comparing examples of siding replacement in Plano.
The in-progress image also demonstrates why homeowners may want photographs taken while exterior work is open. When siding and trim are temporarily removed, parts of the wall assembly that are normally hidden from view can become visible. Seeing that stage helps a homeowner understand the construction sequence around the window opening and how different the wall can look while siding and trim are temporarily removed. For a homeowner, that kind of record can help connect the finished exterior to the work that occurred before the final surface was restored.
Another useful feature of this project is the contrast between brick and siding. Mixed-material elevations rely on clean visual boundaries. Brick has its own texture and joint pattern, while horizontal siding creates a different rhythm. Around a large window, the trim helps mediate between those surfaces. In the finished Plano photograph, the window surround appears orderly and the adjacent siding forms a consistent backdrop above the brick. That coordinated appearance is a reasonable visual consideration for anyone planning work on a similar home. Homeowners evaluating siding replacement should also think about the specific architectural features that will be included in the scope. Large windows, projections, corners, roof-adjacent walls, and brick-to-siding transitions can each affect how the finished exterior looks. Asking for project photos that resemble the features on your own home can be more useful than looking only at broad whole-house images. This Plano example is particularly relevant for a homeowner with a prominent arched window because the photographed work is concentrated exactly where the siding and window surround meet.
The supported project story is therefore both specific and practical. This was a siding replacement in Plano, TX. The active-work photograph shows siding and trim removed around a large arched window, with portions of framing or substrate and pink insulation visible. The finished photograph shows that same area covered with light tan or beige siding and completed-looking trim, restoring a continuous exterior surface around the window. For homeowners, the case study offers a clear example of how a detailed architectural opening can move from an exposed work stage to a clean, integrated exterior appearance.
Siding Installation & Repair - From Zero to Perfect in Allen, Texas
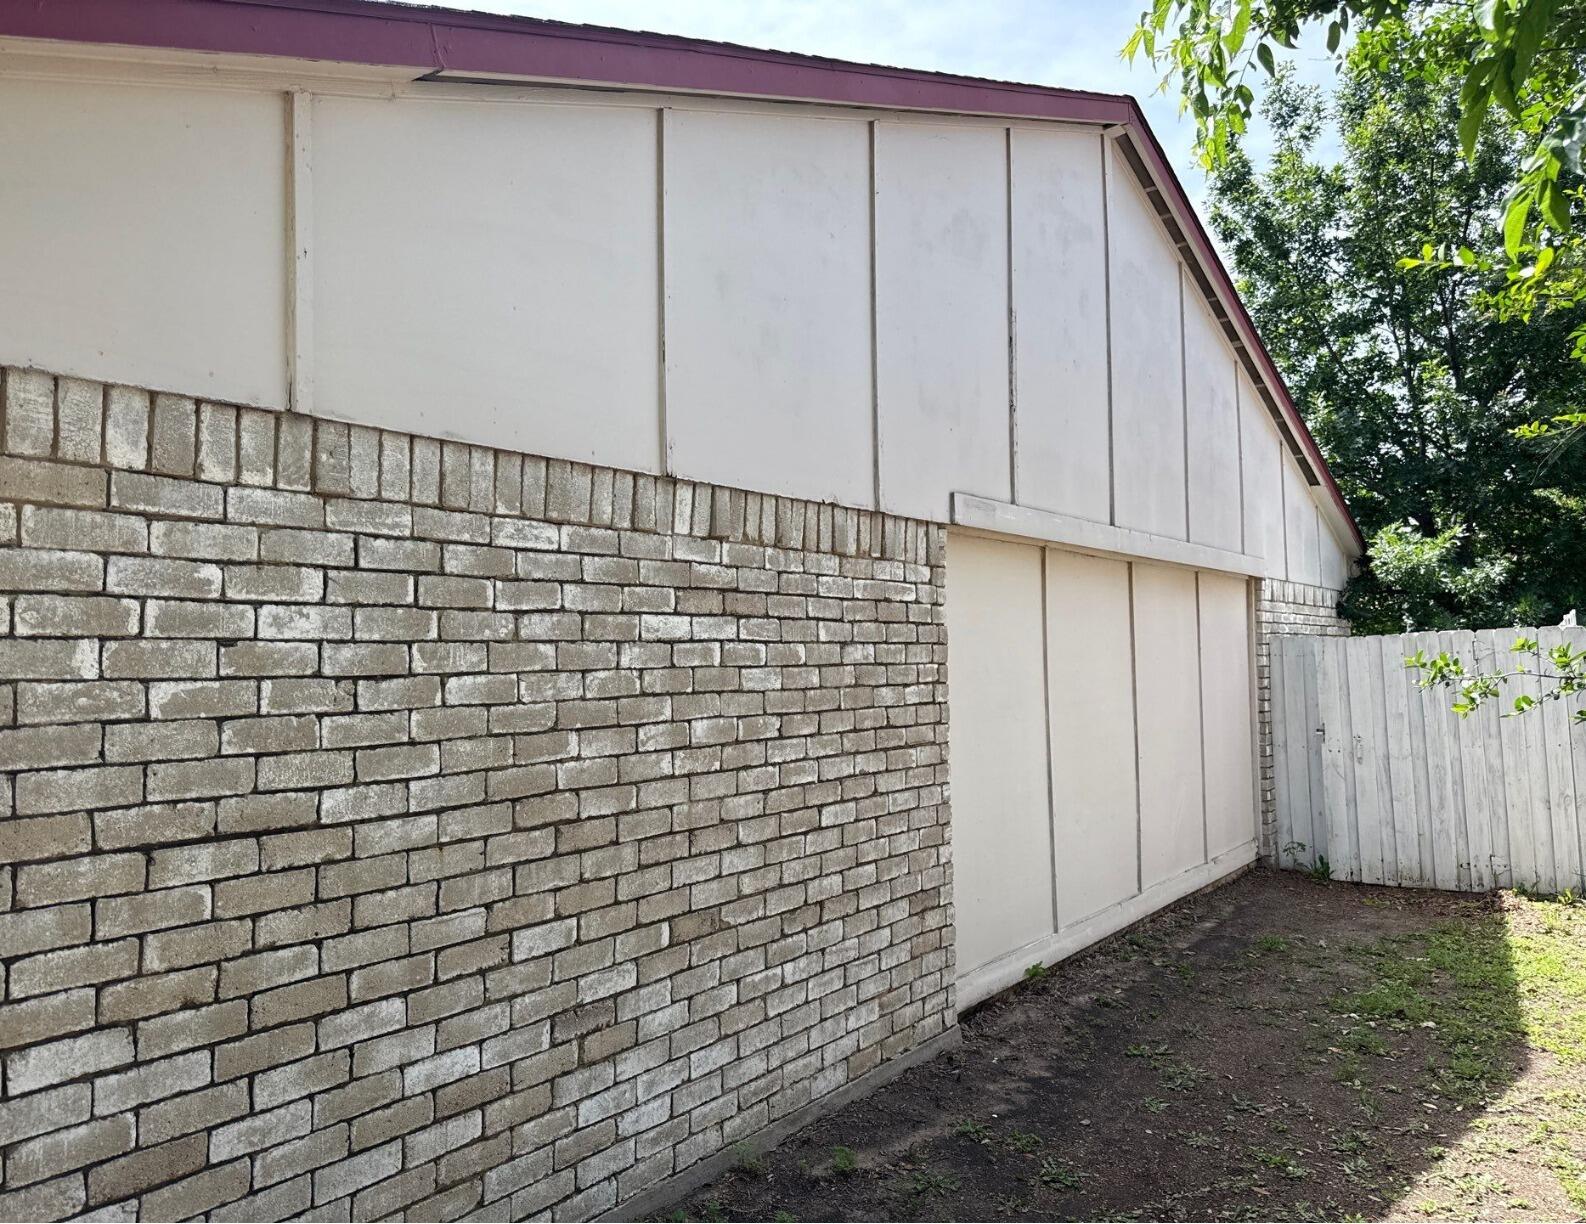
The unfinished wall in the first photo tells only part of the story at this Allen home. The affected garage-side exterior had more than a missing finish layer: the project details identify termite damage, deteriorated materials, and rotten wood beneath the insulation. Those conditions meant new siding could not simply be placed over what was already there. The damaged area had to be addressed first, turning the job into a wall repair followed by siding installation rather than a surface-only exterior update.
In the Before view, the upper wall above the brick is open and visually incomplete. Light vertical material is visible where a normal horizontal siding field would be expected, and the transitions around the roof and wall make the construction condition obvious. This is the point in the job when the exterior is most revealing. Once cladding is removed, the materials behind it become accessible, and problems that were hidden by the finished surface can be dealt with before the wall is closed again.
That sequence is central to this project. Termite damage and rotten wood affected the same wall section, so repairs came before the new exterior finish. For homeowners considering siding installation and repair, the Allen work illustrates why the visible siding is only the last layer a person sees. When the material behind it is compromised, the correct scope can involve opening the wall, repairing what is damaged, and then rebuilding the finished exterior.
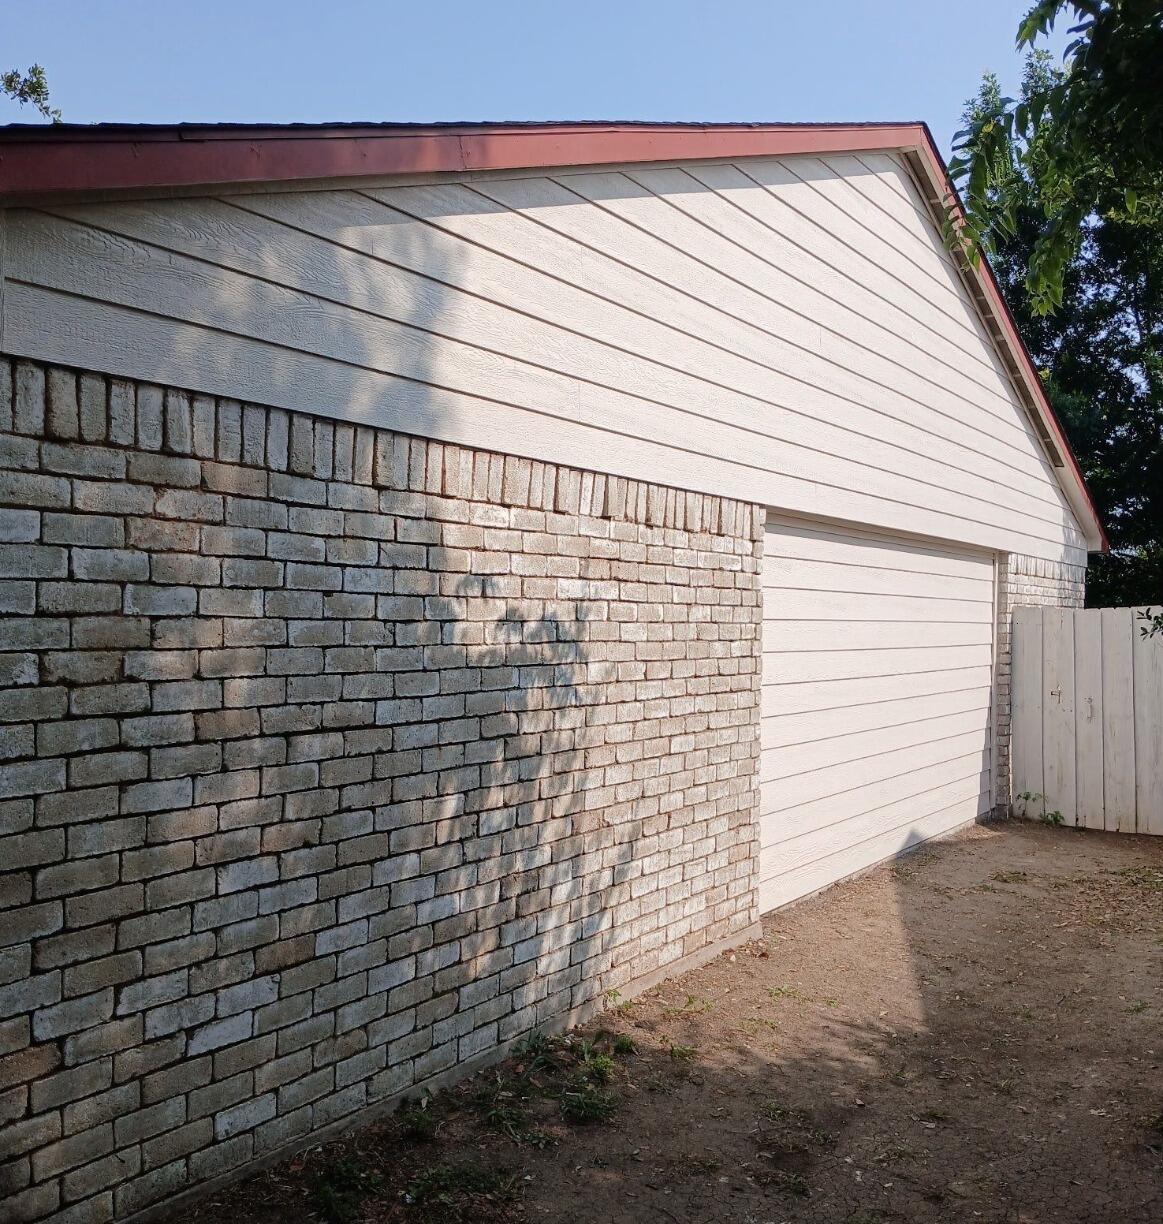
The After photo returns attention to the outside of the house. Light horizontal siding now covers the garage-side wall in continuous courses above the brick.
The unfinished vertical surface from the earlier image is gone, and the lines of the new siding follow the same elevation around the adjacent roof area. Because the brick, garage geometry, and surrounding structure did not change, the finished cladding can be compared directly with the open condition that came before it.
There is an important visual difference between this project and a simple color change. The strongest transformation is not from one siding color to another; it is from an exposed, compromised wall section to a completed wall. That distinction keeps the project grounded in the work that actually occurred. The termite damage, deteriorated material, and rotten wood explain why repairs were needed, while the final siding shows how the exterior looked once the wall had been put back together.
On mixed brick-and-siding homes, the upper cladding has to work with permanent features below and beside it. The masonry line, roof intersection, corners, and trim create fixed boundaries that make alignment noticeable. That is one reason exterior remodeling in Allen can require careful attention even when the work is concentrated on one wall. A repaired section should return to the house as part of the existing architecture, not remain visually separated from it.
The photos also show why homeowners may not know the full condition of an exterior wall until materials are removed. From a normal yard view, siding presents a closed surface. During this job, opening the affected area revealed conditions beneath the insulation that had to be handled before installation could move forward. On this house, opening the wall made those underlying conditions visible at the stage when they could be repaired before the siding returned.
More Before & After exterior projects show different kinds of transformations, but this one is defined by what happened between the two photos. The starting wall was open, deteriorated material had been identified, and repair work was required. The ending wall is closed with light horizontal siding above the brick. That progression—from compromised underlying material to repaired wall to finished siding—is what gives the project its distinctive character.


