
Find a Local Klaus Roofing
Contractor Near You!
Before & After Photos
Click on a photo to enlarge.
Roof Replacement in Frisco, TX


A March hailstorm gave this Frisco homeowner several reasons to look closely at the property. Visible impacts had already been noticed on gutters, windows, and fencing, creating concern that the roof might also have been affected.
The next day, a 15-point inspection found hail hits on the chimney cap, roof vents, and pipes, along with roofing granules collected in the gutters. Those observations became part of the decision to move forward with a full roof replacement.
The first photo is taken during active construction rather than before tear-off. Orange roof decking is exposed across parts of the brick home, white underlayment covers other sections, and black property-protection materials are visible below the work area. The bright colors separate the roofing layers visually and make the replacement stage easy to understand. Homeowners considering full roof replacement can see how dramatically a house may change while the old surface is removed and new layers are being installed.
The inspection findings are important because they belong to specific roof components at this Frisco property. Chimney cap, vents, pipes, and gutter granules were among the inspection findings after the storm. Those details help connect the broader exterior impacts the homeowner noticed from the ground with what was found during the roof inspection. The concern moved from visible ground-level impacts to the roof after the inspection found additional hail-related conditions there.
The homeowner filed an insurance hail claim, and the full reroof was completed by the middle of May. That timeline places the construction photo between the initial March storm and the final completed condition. It also explains why the work involved more than an immediate patch. The roof was replaced across the visible system, giving the final image a consistent surface rather than a handful of localized repair areas.
The After photo removes the bright construction colors and temporary protection from the scene. A completed gray asphalt-shingle roof now covers the home, and the work area below has been cleared. Brick walls and the roof geometry remain recognizable, so the transformation can be followed directly from exposed orange decking and white underlayment to the finished gray surface. The house looks settled again because the temporary work stage has disappeared.
For homeowners, the sequence is a useful example of how visible storm impacts can lead to a broader property review. Damage on gutters, windows, or fencing may prompt questions about less accessible roof components. In this case, the next-day inspection found additional hail-related conditions on the roof, and those findings became part of the replacement project. For this Frisco home, the sequence connected the March storm, inspection findings, claim coordination, and full reroof.
The photographs make the construction progression easy to follow, while roofing services in Frisco provide local context for homeowners comparing similar exterior work. The work-stage image exposes roofing layers and protective materials; the final image restores a continuous gray roof. Those two states visually summarize the larger timeline from inspection findings and claim coordination through the mid-May completion.
The work-stage photograph also makes the protection below the roof part of the visual story. Black materials are positioned around the property while exposed decking and underlayment remain overhead, showing that replacement activity affects both the roof and the area immediately beneath it. Once the job is complete, those temporary protections disappear along with the exposed layers, leaving the gray roof and cleared exterior as the final condition.
Other Before & After roof replacements may begin with different causes or show different stages. This Frisco project is defined by a March hail event, a next-day 15-point inspection, impacts on several roof components, and a full replacement completed by mid-May. The final gray roof provides a clear endpoint to that sequence, replacing the exposed construction layers with one finished surface across the brick home.
Floor restoration after water damage in Plano, TX


The damage inside this Plano living room began outside the room itself. After a major hailstorm, an active leak developed around the chimney area and water traveled into the house, down the walls, and into the flooring. The exterior roof issue was addressed first, but that did not erase the interior consequences. The first photo shows the living room during demolition, with broken flooring, tools, and workers surrounding the white fireplace. The room is clearly past the leak event but still far from being restored. Floor restoration required removing the affected old flooring layers rather than covering the damaged surface. Baseboards were also replaced, and the walls were painted as part of bringing the room back to a finished condition. Those tasks are closely connected visually. Flooring defines the large horizontal surface, baseboards frame its edges, and wall color meets the trim immediately above. When water damage affects all three, completing only one of them would leave the room looking incomplete.
The connection between roofing and interior restoration is central to this project. The water entered around a chimney-related exterior problem, yet some of the most visible work took place at floor level. Homeowners dealing with a similar sequence can find broader context through water-damage restoration, while the Plano photos show exactly how one living room changed after the exterior leak had already been addressed.
The white fireplace serves as the strongest fixed landmark in both images. During demolition, it rises above a floor covered with broken material and active work. In the completed room, the same fireplace sits beside a continuous light wood-look floor, white baseboards, and freshly finished walls. Because the fireplace remains recognizable, it helps the viewer confirm that the transformation happened within the same space and makes the change in floor condition especially easy to follow. The project was also handled under the same insurance claim and deductible connected with the storm loss. The exterior and interior work belonged to the same restoration because both followed the same storm-related water event. The physical result remains the clearest focus: an opened, damaged living-room floor was removed and rebuilt, trim was replaced, and the walls were painted after the leak-related work moved indoors.
For a homeowner, one practical lesson is that stopping water entry and restoring a room are separate milestones. Once the exterior problem has been addressed, damaged finishes may still need removal and replacement before the interior feels normal again. The Before image sits squarely in that second phase. It shows the room after the need for interior work is already apparent, while the After image shows the point when the floor, baseboards, and walls once again form a complete finished space.
Readers looking at roofing and remodeling work in Plano can also see why cross-trade coordination matters on water-loss projects. A chimney-area leak belongs to the exterior envelope, but flooring and baseboards belong to the interior. The work may move through different parts of the house even though the damage has one origin. This project connects those areas clearly without treating the floor replacement as an unrelated renovation.
The room also demonstrates how demolition can make a familiar space look temporarily more damaged than it will at completion. Broken floor pieces, tools, and active work dominate the first image because the affected materials are being removed. Once the new flooring and trim are installed, those temporary elements disappear. The contrast helps separate the necessary restoration stage from the calm finished room the homeowner sees after the work is complete.
More Before & After restoration projects show other kinds of recovery, but this living room has a particularly direct visual progression. Broken flooring and tools fill the starting image; light plank flooring, white trim, and finished walls define the ending. The Plano home moves from interior demolition after a chimney-area leak to a clean, complete living space where the floor and surrounding finishes have been restored together.
Chimney Siding Replacement in Plano, TX


Hail damage at this Plano home was concentrated around the chimney, where siding, roofing transitions, and the wall beneath the exterior finish all come together. The project also involved a leak, and the work uncovered holes in the wood panels beneath the chimney siding. That made the repair more involved than replacing a few visible siding pieces. The affected area had to be opened far enough to address multiple layers before the chimney exterior could be finished again.
The Before photo captures that open condition clearly. Siding has been removed from the chimney face, wood or sheathing is exposed, and inspection markings identify areas of direct physical damage. Flashing is visible where the chimney meets the dark shingle roof. For homeowners considering siding repair and replacement, this image is a good reminder that cladding can hide the materials immediately behind it until a damaged section is opened.
The replacement scope included new siding pieces, step flashing, underlayment, and a fresh coat of paint. Each item belongs to a different part of the chimney assembly. Siding and paint define much of the visible wall surface, while flashing and underlayment belong closer to the roof-to-chimney transition. Bringing those components together is what allowed the project to move from an exposed repair area to a completed exterior. In the After photo, light horizontal siding once again covers the chimney, and the trim presents a clean finished edge beside the roof. The open wood surface and damage markings are gone. Because the dark shingles remain visible around the chimney, the relationship between vertical siding and sloped roofing is easy to see. The transformation is concentrated in that junction, where the repaired wall and roof-related details meet.
Chimneys create a demanding exterior transition because water has to move around a vertical structure that interrupts the roof plane. That general condition helps explain why siding and flashing can appear in the same repair scope. On this Plano project, a major hailstorm damaged the chimney siding, a leak had occurred, holes were present in wood panels, and the repair included step flashing and underlayment as well as new exterior siding.
The paint step also matters visually. After damaged layers are replaced, color and finish help the new siding and trim read as one completed chimney rather than a collection of recently installed parts. The light finished surface in the final image contrasts with the open wood of the Before condition. That makes the project easy to follow even for someone who cannot see the underlayment once the work is closed.
Plano homeowners can find broader local context through exterior restoration services in Plano, while the work here stays focused on this chimney. The repair crossed the boundary between visible cladding and roof-transition materials because the damage reached both areas. Keeping those layers coordinated was part of returning the chimney to a finished condition after the hail-related leak and wall damage.
The inspection markings in the first image also give the damaged wood a very different character from ordinary exposed construction material. They direct attention to specific points on the opened chimney face, while the final image removes that visual clutter entirely. Once the siding and trim are back in place, the repaired area no longer reads as an inspection zone; it reads as part of the finished exterior again.
The completed chimney no longer displays exposed wood, open siding edges, or marked damage areas. Instead, horizontal siding, trim, paint, and the roof transition form a coherent exterior surface beside the dark shingles. From hail-damaged layers and a leak to a rebuilt light chimney face, the Plano project shows a concentrated repair in which the hidden wall condition and the visible finish both mattered to the final result.
New Fence For Our Client


The old privacy fence at this Plano property was visibly losing its ability to hold a straight boundary. Weathered boards lean at different angles, sections look loose, and deteriorated posts interrupt the fence line along the vegetated edge of the yard.
The fence was falling apart and was barely standing after the last storm. That condition made replacement a practical exterior-restoration job rather than a routine staining or cosmetic maintenance project.
The new fence uses pre-stained cedar boards and heavy-duty 13-gauge U.S. steel poles, both included in this installation. Those material details give the After photo more meaning. Instead of simply showing a newer wood color, the finished view represents a rebuilt boundary with a different post system and a consistent board layout. A decorative catwalk detail was also included as part of the completed fence, adding a small personalized element to an otherwise functional property enclosure.
In the Before photo, the top line rises and falls with the leaning sections, so the eye notices the instability immediately. The reddish-brown replacement creates the opposite effect: boards stand in a straight continuous run and the upper edge reads as one controlled line. Homeowners considering exterior restoration work can see how much of a fence transformation comes from alignment and repetition, not just from replacing gray wood with freshly stained boards.
Posts are especially important visually because every fence section depends on them for its position along the boundary. The steel poles are not the dominant feature in the finished photo, but they form part of the new assembly behind the cedar boards. That is a different condition from the deteriorated fence at the start, where leaning sections and worn supports made the entire enclosure look unsettled. The new fence presents a much more organized edge to the yard.
A privacy fence also occupies a large portion of many backyard views. Even if the house itself is unchanged, replacing the boundary can alter how the entire outdoor space feels from a patio, window, or lawn. This Plano project demonstrates that scale clearly. The vegetation and general yard remain familiar, while the fence changes from an irregular weathered backdrop to a straight reddish cedar surface stretching continuously along the property edge.
For homeowners, storm damage can sometimes accelerate a decision that deterioration has already made necessary. Here, the fence was described as falling apart and barely standing after the last storm, so the chosen response was a complete new assembly. The project should not be generalized to every storm-exposed fence, but it does show what full replacement can look like when widespread condition issues have taken over the existing enclosure.
Readers comparing Plano home improvement projects can also see the value of keeping material facts specific. This fence is not described simply as “new wood.” It uses pre-stained cedar boards and 13-gauge U.S. steel poles. Those details define this installation and help distinguish it from another fence that might use a different species, finish, or support system.
The straight finished top edge also makes the fence easier to read against the trees and shrubs behind it. In the earlier view, leaning sections break that line repeatedly, so the background and fence compete visually. After replacement, the cedar boards form a consistent screen in front of the vegetation. That simple alignment is one of the clearest signs that the boundary was rebuilt as a complete system rather than corrected one loose board at a time.
Additional Before & After exterior projects cover many types of work, but the visual payoff here comes from one long horizontal boundary. The failing, leaning fence is removed from the scene and replaced by straight pre-stained cedar boards with a consistent top line. The Plano yard keeps its familiar surroundings while the enclosure changes from barely standing to a newly built, orderly property edge.
From Rotten to Renewed - Complete Fence and Gate Upgrade in Mckinney
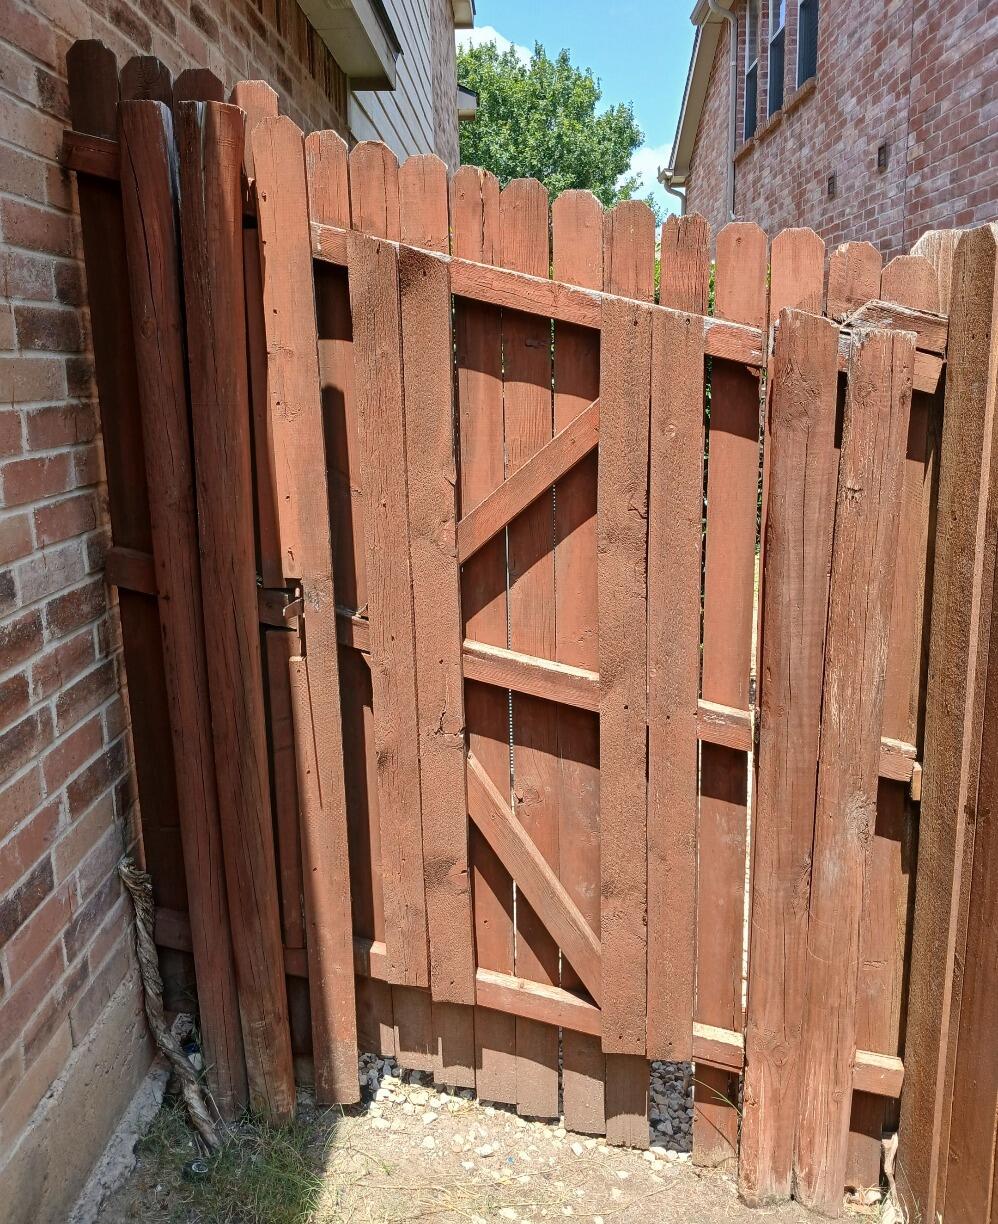
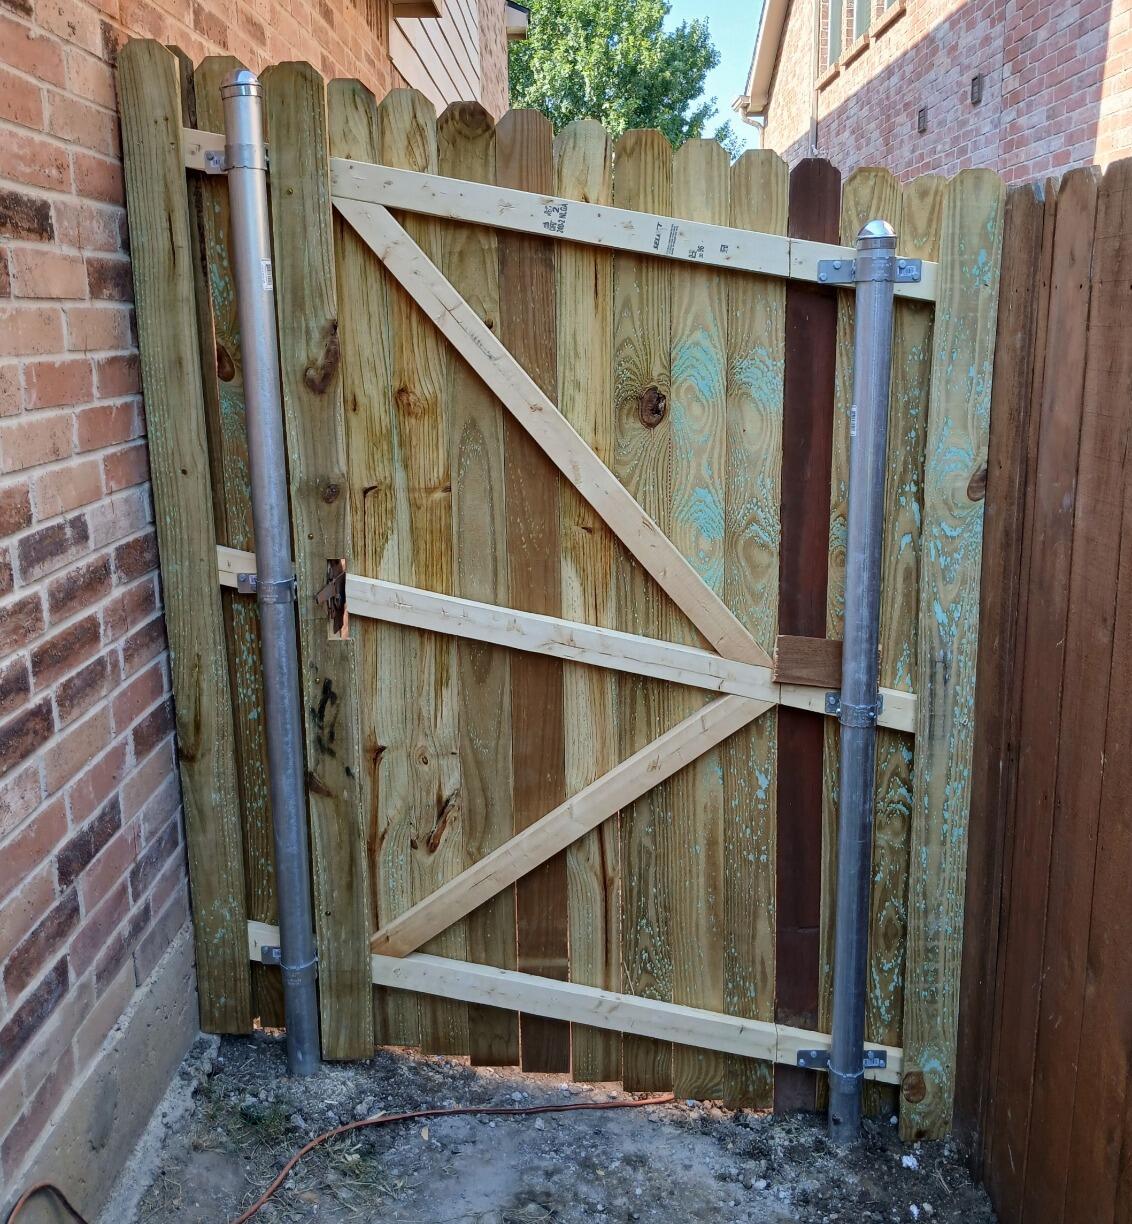
The side-yard gate at this McKinney property had moved far beyond ordinary weathering. In the Before photo, the reddish wood is split, misaligned, and visibly sagging, leaving the opening with an uneven and deteriorated appearance.
The project details connect that condition to ongoing exposure to moisture, corrosion, and pests, and describe the wood as rotten and unsafe. Rather than trying to straighten or patch a failing gate, the affected fence-and-gate section was removed and replaced.
A gate has a different job from a stationary fence panel because it has to move while still forming part of the same boundary. When boards deteriorate and the assembly sags, both the opening and the surrounding fence line can become visually disorganized. This project addressed the gate together with the compromised section around it, which is why the After photo reads as a coordinated replacement rather than a new door hung inside an old, failing enclosure.
The completed assembly uses light wood, round steel posts, visible metal hinges, and diagonal bracing across the gate. Those details are easy to distinguish in the close view. The lighter material creates an immediate contrast with the dark, weathered wood that was removed, while the diagonal brace gives the new gate a strong visual structure. For homeowners considering exterior restoration and improvement work, the McKinney project shows how a small side-yard area can benefit from treating the gate and adjacent fence as one connected element.
The same property had also recently received a new Klaus Roofing Systems roof, but the fence photos keep this transformation centered on the ground-level enclosure. That distinction matters because a house can undergo several exterior improvements without every project needing to be blended into one story. Here, the fence and gate have their own condition, their own replacement scope, and their own visible result. The newer roof is part of the broader property context, not a substitute for the details of the fence work.
For a homeowner, the side yard is often a working space rather than a formal front elevation. It may be a route for lawn equipment, trash bins, pets, or access to the backyard. A deteriorated gate is therefore encountered repeatedly. Replacing it can change the daily experience of the property even though the project occupies only a narrow strip beside the house. The After photo emphasizes that practical scale: one opening, one new gate, and a renewed section of fence aligned across it.
The steel posts are another visible reference point. In the finished view they create clear vertical anchors, while the wood boards and rails define the fence line between them. That combination produces a more orderly boundary than the split and sagging wood seen before. Readers looking at McKinney exterior remodeling projects can compare this kind of focused replacement with larger whole-yard or whole-house work and see how much difference a narrow access point can make.
Nothing in the comparison requires an exaggerated transformation story. The damaged gate is plainly visible at the start, and the new assembly is plainly visible at the finish. The deterioration from moisture, corrosion, and pests explains why replacement was chosen. The After photo then documents the specific physical answer: light wood, diagonal bracing, metal hinges, and round steel posts arranged into a straight, usable-looking side-yard boundary.
More Before & After home projects cover roofs, interiors, and other exterior features, but this McKinney job stays tightly focused on a gate that had become rotten and unsafe. The final view closes that problem with a new fence-and-gate section that is aligned, visually consistent, and clearly separated from the deteriorated condition shown at the beginning.


